Of all the file problems that cause delays at the pre-press stage, folded leaflet artwork generates more than almost any other product. The issues are predictable and avoidable — wrong panel widths, missing bleed, RGB colour mode, content too close to fold lines — and they nearly always come from treating a z fold like a flat leaflet with a fold added at the end.
This guide covers the key setup requirements for z fold leaflet artwork: how to structure your file, the dimensions that matter, what bleed and safe zones look like across six panels, and how to use Better Printing’s templates to avoid the common mistakes before you upload.
A flat leaflet has two sides. A z fold leaflet has six panels — three on each side of a single sheet — and the way those panels relate to each other in print is fundamentally different from how they appear in your design file.
The most important rule: each panel must be designed as a self-contained section, not as part of a continuous spread. A design element — a background colour, a photograph, a gradient — that runs across multiple panels without respecting the fold lines will be interrupted by the crease. In some cases, a background that bleeds across panels will print correctly. In most cases, key content (text, logos, images that frame a message) that straddles a fold will appear distorted or cut off.
Reading order also matters in a way it doesn’t for flat leaflets. The z fold opens in a specific sequence, and different panels are visible at different stages of opening. The outer front panel is the first thing a reader sees. Turning the leaflet over reveals the outer back panel. Opening out reveals the inner spread. The order of content should follow this physical sequence — not the order that made sense on screen.
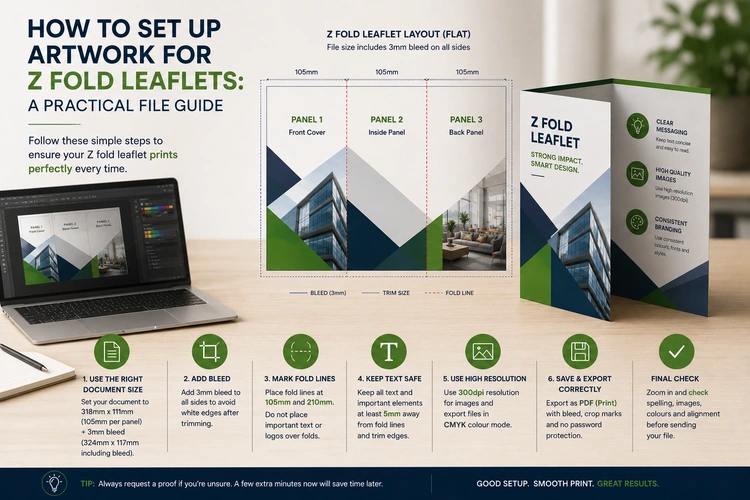
When setting up your file, work with two spreads: one for the outside (front cover, right panel, back panel), and one for the inside (left inner panel, centre inner panel, right inner panel). Most print-ready PDF setups for z fold use this two-spread structure, and Better Printing’s templates are built this way.
Z fold panels are equal in width — this is one of the format’s key advantages over tri fold, where the inner panel must be narrower. Divide your flat sheet width by three, and you have your panel width.
For a standard DL z fold (A4 landscape sheet, 297 mm wide): each panel is 99 mm wide.
However, there is a small exception worth knowing: the closing panel — the panel that sits outermost when the leaflet is fully closed — is sometimes made 1–2 mm narrower than the other two. This prevents the edge of the closing panel from catching or protruding beyond the edges of the panels beneath it when the leaflet is folded. Better Printing’s templates already account for this; if you’re building your own layout from scratch, check whether your printer’s specification includes this adjustment.
The practical implication: if you’re placing important content near the right-hand edge of the closing panel, keep it within the safe zone with an extra 1–2 mm margin of caution. Content near fold lines on any panel should be treated with care — see the bleed and safe zone section below.
Before finalising panel widths in your artwork, confirm the finished size you’ve ordered. Panel width calculations depend on the flat sheet dimensions, which vary by format. Our guide to Z Fold Leaflet Sizes Explained covers the relationship between flat sheet and finished size for each standard format.
These three concepts apply to any print file, but they require particular attention on folded formats because each panel effectively has its own set of edges and fold lines to manage.
Bleed is the zone beyond the trim edge where your background artwork continues. It exists because cutting and trimming are not perfectly precise — a small amount of variation in the cut position is normal, and bleed prevents a white border appearing if the cut runs slightly inward. For z fold leaflets, add 3 mm of bleed on all outer edges of the flat sheet. Do not add bleed along internal fold lines — the folds are not cut.
Trim line is where the sheet will be cut to its final dimensions. Your artwork must extend to the bleed line, but the trim line is the boundary of the finished leaflet.
Safe zone is the area inside the trim edge where you should keep all important content — text, logos, contact details, key images. Keeping content within the safe zone protects it from being cut off if trimming runs slightly outside the intended position. The industry-standard safe zone for z fold leaflets is typically 5 mm inside the trim edge on outer edges — check Better Printing’s downloaded template for the exact guides used in your specific format.
For fold lines specifically — the internal creases between panels — treat the area within 4–5 mm on either side of a fold as a risk zone for key content. A fold under mechanical pressure will shift the paper slightly, and content that runs close to a fold line may appear to jump position or look misaligned between panels. Backgrounds and full-bleed images that cross fold lines are generally fine. Headlines, logos, and body text should stay clear.
These are the two most common technical reasons a file gets flagged or rejected during pre-press checks.
Commercial printing uses four inks — Cyan, Magenta, Yellow, and Black (CMYK). Design software defaults, including Adobe Photoshop and many online tools, work in RGB (Red, Green, Blue), which is optimised for screens. When an RGB file is converted to CMYK for print, colours shift — sometimes subtly, sometimes dramatically. Blues tend to become more muted. Bright oranges and greens can lose saturation. The result often looks markedly different from what you approved on screen.
Set your document to CMYK colour mode before you begin designing, not after. Converting at the end is better than not converting at all, but colours will still shift from your screen-preview if you designed in RGB. If your brand uses specific Pantone colours and colour accuracy is critical, discuss spot colour options with Better Printing before placing your order.
Images that look sharp on screen at 72 dpi will print blurry. The minimum resolution for print-quality photography and detailed illustration is 300 dpi at the final printed size. This means that if you’re using an image at full panel width on a DL z fold (99 mm wide), that image must be at least 300 dpi at 99 mm — not 300 dpi at a smaller size that you’ve then scaled up in your layout. Scaling up a low-resolution image in InDesign or Illustrator does not add resolution; it only makes the problem larger.
Check the actual resolution of placed images in your layout before exporting, not just the file’s pixel dimensions.
Better Printing provides downloadable artwork templates for z fold leaflets in PDF, Adobe Illustrator, and InDesign formats. Templates are available from the product pages or the templates section of the support area.
Each template shows the flat sheet dimensions at the correct size, panel dividers marking the fold positions, bleed lines (3 mm beyond the trim on outer edges), trim lines, safe zone guides (5 mm inside trim), and panel numbering to indicate reading order.
The single most common mistake when using templates is overriding the guide settings — moving or deleting guide lines because they interfere with a design element. The guides exist to show you where the physical constraints of the product sit. If a design element conflicts with a guide, the element needs to move, not the guide.
A second common mistake is setting up the file at a different size from the template and scaling everything at export. This causes bleed and safe zones to scale proportionally, putting them in the wrong position relative to the actual printed dimensions. Always work at 100% document size, at the exact dimensions shown in the template.
If you’re using design software that doesn’t support the template format (for example, Canva or similar browser-based tools), manually input the flat sheet dimensions, set bleed to 3 mm on outer edges, and keep all key content at least 5 mm from trim edges and 5 mm from fold lines.
Every file submitted to Better Printing goes through a pre-press check before it enters production. The team reviews document dimensions, bleed on all outer edges, colour mode (RGB files are flagged), image resolution at placed size, font embedding, and whether critical content sits within the risk zone of a fold line. If the ordered stock is 170 gsm or above, the team also checks whether the spec is set up for creasing — see our guide to Choosing Paper Weight and Finish for Z Fold Leaflets for why this matters at heavier weights.
If the pre-press check finds an issue, Better Printing will contact you before printing. Common outcomes: a file flag with a request to correct and resubmit, or — for minor issues — a note asking for your approval to proceed as-is. Either way, your turnaround clock is paused until the file is approved. Getting your file right before upload is the most reliable way to keep your delivery on schedule.
If you’re unsure about any step, Better Printing’s team can advise before you submit — call 023 8087 8037 or use the contact form on site.
Once your artwork is prepared, you can upload it directly at checkout or email it to the team after placing your order. Browse formats and configure your z fold leaflet printing order on the product page.

